13 minutes
Xenvman Tutorial
[2019-01-25]: Updated for xenvman version v2.0.0
This is a short tutorial on how to use xenvman.
We’re going to build a simple server-side app and show how xenvman
can be used in order to provide the environment needed for integration testing.
But first a brief word on what xenvman actually is. It is a tool (implemented as HTTP API server) which can create isolated environments, bubbles of groups of containers running together and providing necessary dependencies for your app/service. A detailed overview along with API reference is available on the github page.
For this tutorial we’re going to build a backend for the Bro app
(you know, the one from Silicon Valley series).
In case you lived under a rock and missed the show, here’s the gist:
the Bro app allows you to send a word “Bro” to every person who has the Bro app installed.
The feature list is impressive enough of course, but we’re going to take some risk
to extend it even more. Namely we’ll allow people to send any messages they want,
not only word “Bro” plus users will be able to set angry mode on messages.
Bro API server
The overall architecture looks like this:
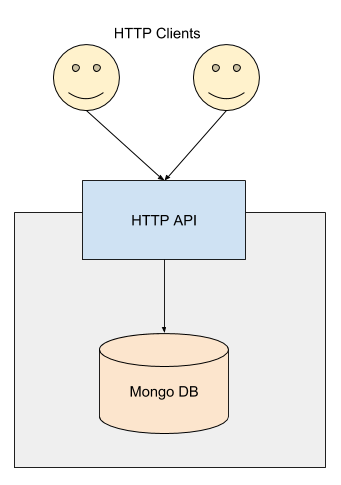
It may look scary and complex but fear not! I’ll walk you through it in no time.
Basically here we have the following three components:
- HTTP API server — just a simple HTTP server, serving API requests from our client apps.
- Mongo DB — A database where we’re going to save message history, so that we’re covered in case NSA decides to come by one day.
- Clients, basically our mobile apps, but we’re going to omit them for this tutorial.
HTTP server is going to have the following API endpoints:
POST /v1/bro
Send a bro message
Body format:
{
  "from": "client-id",
  "message": "message contents",
  "angry": false
}
GET /v1/poll/{id}
Poll for new incoming messages. The response body will contain a list of bro messages.
API server keeps all the current client sessions in memory and upon receiving any bro message it saves it to the message history database and broadcasts it to all the currently active clients (excluding the sender).
The code for our amazing piece of tech is available here. In order to try it out locally, here are the steps:
- Make sure you have Golang installed (at least version 1.11.1 is required)
- Make sure MongoDB is installed
- Clone the tutorial repo
(
git clone https://github.com/syhpoon/xenvman-tutorial.git) anywhere to your local FS (not necessarily to$GOPATH) - Change dir to the cloned repo
- Build the API server:
go build - Run the server:
./xenvman-tutorial run - Open three terminals
- In terminal 1 run:
curl http://localhost:9999/v1/poll/session1In terminal 2 run:curl http://localhost:9999/v1/poll/session2In terminal 3 post a bro message:curl -X POST --data-binary '{"from": "session3", "message": "bro"}' http://localhost:9999/v1/bro - You should see the message broadcasted in terminals 1 and 2
Environments and templates
Now that we have our backend up and running, we can start creating some integration tests for it.
Main idea of integration testing is that instead of mocking external dependencies (such as database, file system, HTTP services etc) we actually run all the required components in a group and test exposed endpoints. xenvman helps us achieving precisely this — easily configure and run disposable groups of components called environments.
An environment is defined by creating (or downloading) one or more templates using JavaScript programming language. It’s totally up to us how to structure templates in general, but in this particular case we’re going to create two templates - one for MongoDB server and another one for the API server itself.
But first, we need to install xenvman.
After it’s done, let’s run xenvman server:
cd <path-to-xenvman-tutorial> && xenvman run -b $(pwd)/tpl
If everything is good, you should see something like this:
2018-11-18T00:38:30-05:00 [INFO] at run.go:134: Using Docker container engine
2018-11-18T00:38:30-05:00 [DEBUG] at conteng_docker.go:75: Docker engine client created
2018-11-18T00:38:30-05:00 [INFO] at run.go:107: Not using any auth backend
2018-11-18T00:38:30-05:00 [INFO] at server.go:130: Starting xenvman server at [::]:9876
Templates dissection
The xenvman-tutorial repo we cloned has a
tpl directory,
which contains our two templates — mongo.tpl.js and bro.tpl.js.
Let’s take a look at the mongo template first:
function execute(tpl, params) {
  var img = tpl.FetchImage("mongo:latest");
  var cont = img.NewContainer("mongo");

  cont.SetPorts(27017);
  cont.SetLabel("mongo", "true");
}
A template is just a JS file defining a
special execute() function.
The first argument, tpl is a template instance and params argument is an arbitrary
json object passed in from HTTP call and is used to configure a template.
In this case, we don’t have any template parameters.
Overall our mongo template is very simple. Let’s walk over each line:
var img = tpl.FetchImage("mongo:latest");
Here we declare, that we want to fetch a mongo:latest image from Docker image hub.
At this point xenvman will not immediately rush into downloading this image,
instead all the instructions in template execute function merely just describe
the required setup and all the actions are performed after all the templates are executed.
var cont = img.NewContainer("mongo");
Here we instruct xenvman to spawn a container, named mongo from the mongo image. Here again, no container is being created at this point, it’s just another declaration of intent, if you will.
cont.SetPorts(27017);
This line above tells xenvman to expose a container port 27017 so that we can access it from outside.
cont.SetLabel("mongo", "true");
Here we set a label on the container. Labels are used to establish relations between components within an environment. In this particular case we need to label mongo container in order to be able to discover it in the bro API server.
Mongo template deals with so called fetch images, that is it simply pulls an existing image from some registry and spawns containers off it.
There’s another type — build image templates, those are used to build images on the fly. Our Bro API template is of such kind.
Build image templates usually have a bunch of files which we need to include during the process. All those files are located in the template data directory. In this case, it’s bro.tpl.data.
Let’s take a look at what’s inside data dir:
bro.tpl.data/
  Dockerfile
  config.toml
As you can see, there’s not much to include into the Bro image. Only Dockerfile and config, that’s it.
“Wait a minute!”, you can say, “Where’s the actual bro server binary!?” Well, this is actually one of the most useful features xenvman provides — the binary is a dynamic part of the image, you provide it along with your API request when creating a new environment. This way you can test the bleeding edge version directly after having it compiled on your dev box, even without merging your changes to the upstream branch!
Dockerfile is dead simple:
FROM ubuntu

COPY bro /
CMD ["/bro", "run", "-c", "/config.toml"]
It expects a bro binary to be present in the workspace dir and it will be copied
to the image. But how come we never added a config file to the image?
This is because we’re going to mount it into the container later on in order
to be able to leverage some more advanced interpolation.
config.toml file looks like this:
{{with .ContainerWithLabel "bro" "" -}}
listen = ":{{.GetLabel "port"}}"
{{- end}}

{{with .ContainerWithLabel "mongo" "" -}}
mongo = "{{.Hostname}}/bro"
{{- end}}
Clearly there’s something suspicious going on here. Let’s try to decipher.
Broadly speaking, files mounted into the container can be of two types — static,
mounted as is and dynamic — containing some variable parts. This is controlled by
interpolate flag in MountData container method.
We use Golang template language in dynamic files. If you’re not familiar with it you’d likely need to take a quick look at the link above before reading further.
In the first section:
{{with .ContainerWithLabel "bro" "" -}}
listen = ":{{.GetLabel "port"}}"
{{- end}}
among all defined environment containers we’re finding one having label bro (with any value) and then getting port label value of that container. Corresponding lines from the template, setting these labels are the following:
var port = 9999;

if (type.IsDefined(params.port)) {
  port = params.port;
}

cont.SetPorts(port);
So if the port was 9999, then the block in the mounted config above would look like:
listen = ":9999"
Similar stuff is happening in the second block of the config:
{{with .ContainerWithLabel "mongo" "" -}}
mongo = "{{.Hostname}}/bro"
{{- end}}
First we find a container possessing label mongo, and then use its hostname
(an internal docker network one) in Mongo url parameter.
By the way, hostnames in environment are defined using the following format:
<container-name>.<template-index>.<template-name>.xenv
So in this case, our mongo hostname will look something like mongo.0.mongo.xenv
Let’s take a look at a bro template now:
function execute(tpl, params) {
  // Params type checking
  type.EnsureString("binary", params.binary);
  type.EnsureNumber("port", params.port);

  // Create image
  var img = tpl.BuildImage("xenvman-tutorial");
  img.CopyDataToWorkspace("Dockerfile");

  // Extract server binary
  var bin = type.FromBase64("binary", params.binary);
  img.AddFileToWorkspace("bro", bin, 0755);

  // Create container
  var cont = img.NewContainer("bro");
  cont.MountData("config.toml", "/config.toml", {"interpolate": true});

  var port = 9999;

  if (type.IsDefined(params.port)) {
    port = params.port;
  }

  cont.SetPorts(port);
  cont.SetLabel("port", port);
  cont.SetLabel("bro", "true");

  cont.AddReadinessCheck("http", {
    "url": fmt('http://{{.ExternalAddress}}:{{.Self.ExposedPort %v}}/',
               port),
    "codes": [200]
  });
}
The first block deals with parameters typing:
type.EnsureString("binary", params.binary);
type.EnsureNumber("port", params.port);
There’s a bunch of functions in the type module, which can be used to verify types
of the template parameters. All the type.Ensure* functions pass if either given
parameter is of required type or it is not defined and panic otherwise.
Next we have the following:
// Create image
var img = tpl.BuildImage("xenvman-tutorial");
img.CopyDataToWorkspace("Dockerfile");
Here we create an image with the name xenvman-tutorial and then copy our Dockerfile from
the template data dir bro.tpl.data to the image workspace dir. Recall, that all the files
in image workspaces can be included in the resulting image
(if there’s an appropriate entry in Dockerfile, of course).
Now, once we have an image, we can start creating containers from it:
// Create container
var cont = img.NewContainer("bro");
cont.MountData("config.toml", "/config.toml", {"interpolate": true});
The first line should be pretty straightforward, we just create a new container
named bro from the image we’ve built earlier.
Next we mount our config.toml file from the data dir into the container /config.toml.
The interpolate: true means, that the original file contains some dynamic parts and it needs to be interpolated before mounting. This is exactly what we discussed earlier.
Then we’re going to set some labels:
var port = 9999;

if (type.IsDefined(params.port)) {
  port = params.port;
}

cont.SetPorts(port);
cont.SetLabel("port", port);
cont.SetLabel("bro", "true");
Basically we check if port was provided in parameters then we use it for a label value and use 9999 as a default one otherwise. Plus we set a “bro” label in order to be able to find this container during config interpolation phase.
And finally we have the following:
cont.AddReadinessCheck("http",
 {
    "url": fmt('http://{{.ExternalAddress}}:{{.Self.ExposedPort %v}}/', port),
    "codes": [200]
  });
Here we define a readiness check. The main idea for readiness checks is to wait until our environment is ready before returning it to the caller. The notion of being ready is different for different use cases, of course but in this particular case we consider our container to be ready as soon as our Bro API server is up and running. This is accomplished by making sure HTTP response code on the / URL is 200.
A container can define multiple readiness checks and xenvman will make sure all of them pass before returning.
Integration test
So now when we understand the structure of the templates, let’s finally write our first integration test.
Because xenvman exposes all the functionality via HTTP API, we could use any language/tool which supports HTTP protocol. But as our Bro server happens to be written in Go (what a lucky coincidence!), we will just use xenvman Go client.
The full test file code is available here. Let’s walk through it block-by-block.
The very first line is:
// +build xenvman
Here we’re using Go build tags.
Overall, our integration test uses the regular Go testing toolkit,
meaning that when running go test ./... integration tests are going to be executed
along with normal unit tests. And because integration tests are usually much slower,
we’d want to separate these two types of tests somehow.
And this is exactly why we’re setting the build tag here. Unless explicitly provided
with go test -tags xenvman integration tests will not be run.
On the other hand, if we do provide -tags xenvman then ALL tests will be run.
If this is not what we need then we can adopt a naming convention,
to include some unique suffix to every integration test function name and use -run flag
when starting the tests. For example, in our case the test function is named “TestXenvmanBro”
so running go test -tags xenvman -run Xenvman will only run our integration test.
Whew! Let’s now try to summarize:
To run only unit tests:
- Add
// +build xenvmanto your infrastructure test files - Run unit tests with normal
go test ./...
To run only infrastructure tests:
- Introduce some unique suffix to your test function names, say “Xenvman”
- Run your tests with
go test -tags xenvman -run Xenvman
To run both unit and infrastructure tests:
- Just run
go test -tags xenvman
Okay, so now back to the test code. When we look at TestXenvmanBro function, we see that the first thing happening is creating a xenvman environment:
cl := client.New(client.Params{})

env := cl.MustCreateEnv(&def.InputEnv{
   Name:        "bro-test",
   Description: "Testing Bro API",
   Templates: []*def.Tpl{
      {
         Tpl: "bro",
         Parameters: def.TplParams{
            "binary": client.FileToBase64("xenvman-tutorial"),
            "port":   broTestPort,
         },
      },
      {
         Tpl: "mongo",
      },
   },

   Options: &def.EnvOptions{
	KeepAlive: def.Duration(2 * time.Minute),
   },
})
The call to cl.MustCreateEnv is nothing more than a Go wrapper around xenvman HTTP API
endpoint call. Along with optional environment name and description we define what
templates to use and their parameters.
Then, once the environment is set up we need to obtain addresses (along with ports) of the containers running in our environment. This is done in the following code fragment:
broCont, err := env.GetContainer("bro", 0, "bro")
mongoCont, err := env.GetContainer("mongo", 0, "mongo")
The first argument in the env.GetContainer call is a template name,
the second one is a template index and the third one is the container name.
This function returns a container definition which we’re going to use to extract
exposed port/address.
At this point all what’s left for us is to discover exposed ports for our bro API server and MongoDB. This is done in the following lines:
pollUrl := fmt.Sprintf("http://%s:%d/v1/poll/",
                       env.ExternalAddress, broCont.Ports[portStr])

postUrl := fmt.Sprintf("http://%s:%d/v1/bro",
                       env.ExternalAddress, broCont.Ports[portStr])

mongoUrl := fmt.Sprintf("%s:%d/bro",
                        env.ExternalAddress, mongoCont.Ports["27017"])
env.ExternalAddress contains an IP or hostname a client (our test) needs to
connect to.
<container>.Ports[<port>] contains an external port for
the given internal one.
After we have addresses we simply spawn two HTTP clients to poll for messages and post a message from the third one:
go poller(pollUrl+"1", msgCh, errCh)
go poller(pollUrl+"2", msgCh, errCh)

msg := &BroMessage{
	From:    "3",
	Message: "wut!?",
	Angry:   true,
}

// Post the message
postBody, err := json.Marshal(msg)

resp, err := http.Post(postUrl, "test/javascript",
	bytes.NewReader(postBody))

require.Equal(t, http.StatusOK, resp.StatusCode)

Then we just wait until both pollers receive the message we sent:

// Wait for pollers
got := 0

for got < 2 {
	select {
	case err := <-errCh:
		panic(fmt.Errorf("Poller error: %+v", err))
	case rmsg := <-msgCh:
		require.Equal(t, msg, rmsg)
		got += 1
	case <-time.After(5 * time.Second):
		panic(fmt.Errorf("Poller timeout"))
	}
}
And the last part is to ensure the message was also saved to mongo:
db, err := mgo.Dial(mongoUrl)
db.SetSocketTimeout(0)

col := db.DB("bro").C("messages")

mongoMsg := dbMessage{}
err = col.Find(bson.M{}).One(&mongoMsg)
require.Nil(t, err)

require.Equal(t, *msg, *mongoMsg.Msg)
Conclusion
And that’s pretty much it, guys. If you managed to read this tutorial until the end I want to thank you and I hope it was useful at least a tiny bit.
Feel free to try xenvman for yourself and drop me a note if you find it useful in your work, I’d really appreciate it.